移動した画像がどの場所にいるかを表示する (swift 1.2, 自作クラスの宣言)
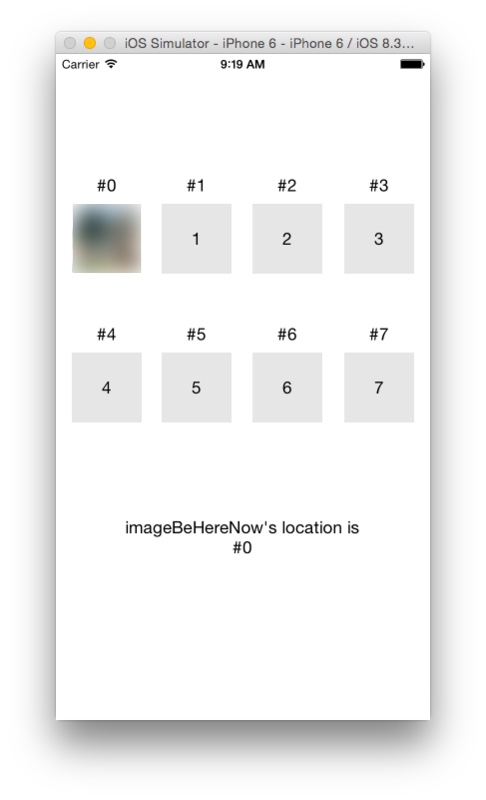
画像を移動するテストアプリをこれとかこれとかこれとかこれで作成しました。 予め区画を用意して、移動後の画像がどの区画の位置にいるかを表示したくなりました。
Githubは以下です。
GitHub - anthrgrnwrld/informLocationImage at e535b2818202986f6178ee544a018ae15ded3ffa
- 画像がどのlocation#にいるかをスクリーンショット下方にあるLabelに表示したいです。

今回は、画像のlocation#の保存のためにUIimageViewを継承したクラスを作成したこと、画像の移動前と移動後の座標管理クラスを新規作成したことが、大きな自分ポイントになります。
自分ポイント1
UIImageViewを継承したLocationImageViewというクラスを作成しました。
その後通常はstoryboardからoutletをcontrol+ドラッグで通常作成します。
が、今回はその前にstoryboardで対象のUIImageViewを選択し、Xcode右側のIdentity Inspectorでcustom classをLocationImageViewに変更します。
class LocationImageView: UIImageView {
    var location: Int! = 0

    convenience init() {
        self.init()
        self.location = 0       //初期はlocation# = 0
    }

}

...

class ViewController: UIViewController {

    @IBOutlet weak var imageBeHereNow: LocationImageView!

    ...

}
自分ポイント2
移動前、移動後(または移動中)のBeHereNow.png中心座標とタッチ座標の管理のためのクラスControlImageClassを作成しました。
これで色んな変数が散らばらずにスッキリしました(気がします)。
- 作成したクラスのインスタンス化の箇所(宣言部)の書き方をずっと間違えており、苦しめられました。
- この為、BuildはSuccessしても実行時に
fatal error: unexpectedly found nil while unwrapping an Optional valueに苦しめられることとなりました。 - 宣言時例えば、
var instanceA: newMyselfClass!だけでは上記エラーになります。 - 正しく宣言すると、
var instanceA: newMyselfClass! = newMyselfClass!()と記載して初期化(なのか?)を同時にする必要があります。
- この為、BuildはSuccessしても実行時に
//二つのCGPointを持つクラス (イメージ移動の座標管理)
class TwoCGPoint {
    var imagePoint: CGPoint!    //イメージの座標保存用
    var touchPoint: CGPoint!    //タッチ位置の座標保存用
}

//タッチスタート時と移動後の座標情報を持つクラス (イメージ移動の座標管理)
class ControlImageClass {
    var start: TwoCGPoint = TwoCGPoint()            //スタート時の画像座標とタッチ座標
    var destination: TwoCGPoint = TwoCGPoint()      //移動後(または移動途中の)画像座標とタッチ座標
    var tag: Int!                                   //移動中の画像のTag保管用

    //startとdestinationからタッチ中の移動量を計算
    var delta: CGPoint {
        get {
            let deltaX: CGFloat = destination.touchPoint.x - start.touchPoint.x
            let deltaY: CGFloat = destination.touchPoint.y - start.touchPoint.y
            return CGPointMake(deltaX, deltaY)
        }
    }

    //移動後(または移動中の)画像の座標取得用のメソッド
    func setMovedImagePoint() -> CGPoint {
        let imagePointX: CGFloat = start.imagePoint.x + delta.x
        let imagePointY: CGFloat = start.imagePoint.y + delta.y
        destination.imagePoint = CGPointMake(imagePointX, imagePointY)
        return destination.imagePoint
    }
}

class ViewController: UIViewController {

...

    var pointBeHereNow: ControlImageClass! = ControlImageClass()    //移動座標管理用変数を宣言

...


    override func touchesBegan(touches: Set<NSObject>, withEvent event: UIEvent) {
        let touch = touches.first as! UITouch
        let tag = touch.view.tag

        //タッチスタート時の座標情報を保存する
        if tag == 1000 {
            pointBeHereNow.start.imagePoint = imageBeHereNow.center
            pointBeHereNow.start.touchPoint = touch.locationInView(self.view)
            pointBeHereNow.tag = 1000
        } else {
            //Do nothing
        }

    }

    override func touchesMoved(touches: Set<NSObject>, withEvent event: UIEvent) {
        let touch = touches.first as! UITouch
        let tag = touch.view.tag

        //移動後(または移動中)の座標情報を保存し、それらの情報から画像の表示位置を変更する
        //タッチされたviewのtagとpointBeHereNowに保存されたtagと等しい時のみ画像を動かす
        if tag == pointBeHereNow.tag {
            pointBeHereNow.destination.touchPoint = touch.locationInView(self.view)
            imageBeHereNow.center = pointBeHereNow.setMovedImagePoint()     //移動後の座標を取得するメソッドを使って画像の表示位置を変更

        } else {
            //Do nothing
        }

    }

...

}
自分ポイント3
AutoLayoutをEnableで作成する場合には初期の表示処理をviewDidLayoutSubviewsに記載することを忘れない。(コレでもやりました。)
class ViewController: UIViewController {

...

    override func viewDidLayoutSubviews() {
        super.viewDidLayoutSubviews()

        //画像の表示位置の決定
        for (index, val) in enumerate(locationLabelArray) {
            let tag = locationLabelArray[index].tag
            let centerPoint = locationLabelArray[index].center
            if self.imageBeHereNow.location == index {
                self.imageBeHereNow.center = centerPoint
            } else {
                //Do nothing
            }

        }
    }

...

}
自分ポイント4
タッチ完了時(touchesEnded時)に然るべき箇所へアニメーションさせたいです。
そのため、各locationラベルとの距離+その最小値を持っているIndexを保存するクラスを作成しました。getDistance() -> distanceClassはそれらを取得するメソッドです。
class ViewController: UIViewController {

...

    //各locationとの距離を管理するクラス
    class distanceClass {
        var distanceArray: [CGFloat] = []
        var minIndex: Int!
    }

    override func touchesEnded(touches: Set<NSObject>, withEvent event: UIEvent) {

        let touch = touches.first as! UITouch
        let tag = touch.view.tag

        //タッチ完了時に最も近いlocation位置へアニメーションで吸着する処理
        //タッチsaretaviewのtagとpointBeHereNowに保存されたtagと等しい時のみ画像を動かす
        if tag == pointBeHereNow.tag {

            var distance: distanceClass = distanceClass()   //locationとの距離を管理する変数
            distance = getDistance()                        //各locationの距離と最小値のindexを保存

            animateToLocationWithDistance(distance)         //最も近いlocationへ or 元の位置へアニメーション

        } else {
            //Do nothing
        }

        outputLocatedInfo.text = "imageBeHereNow's location is #\(self.imageBeHereNow.location)"    //Labelの更新

    }


    //各locationとの距離とその最小値のIndexを保存するメソッド
    func getDistance() -> distanceClass {

        let distance: distanceClass = distanceClass()

        for (index, val) in enumerate(locationLabelArray) {
            distance.distanceArray.append(getDistanceWithPoint1(imageBeHereNow.center, point2: locationLabelArray[index].center))

            if distance.distanceArray[index] == minElement(distance.distanceArray) {
                distance.minIndex = index
            } else {
                //Do nothing
            }

        }

        return distance

    }


    //2点の座標間の距離を取得するメソッド
    func getDistanceWithPoint1(point1: CGPoint, point2: CGPoint) -> CGFloat {
        let distanceX = point1.x - point2.x
        let distanceY = point1.y - point2.y
        let distance = sqrt(distanceX * distanceX + distanceY * distanceY)
        return distance
    }

 ...

}
自分ポイント5
最小距離のlocationラベルとの距離が50未満の時のみ、そのLabelへアニメーションします。それ以外は元の位置にアニメーションします。元の位置のlocation#は、何とLocationImageViewクラス内で保存されている訳です。便利です。
またアニメーションには、UIView.animateWithDurationを使用しています。これは非常にお手軽にアニメーションを作成することができます。
class ViewController: UIViewController {

...

    override func touchesEnded(touches: Set<NSObject>, withEvent event: UIEvent) {

        let touch = touches.first as! UITouch
        let tag = touch.view.tag

        //タッチ完了時に最も近いlocation位置へアニメーションで吸着する処理
        //タッチsaretaviewのtagとpointBeHereNowに保存されたtagと等しい時のみ画像を動かす
        if tag == pointBeHereNow.tag {

...
            animateToLocationWithDistance(distance)         //最も近いlocationへ or 元の位置へアニメーション

        } else {
            //Do nothing
        }

        outputLocatedInfo.text = "imageBeHereNow's location is #\(self.imageBeHereNow.location)"    //Labelの更新

    }

...

    //最も近いlocationへ or 元の位置へアニメーションするメソッド
    func animateToLocationWithDistance(distance: distanceClass) {
        let point: CGPoint!

        if distance.distanceArray[distance.minIndex] < 50 {
            //最小値の距離が50未満の時は、そのlocationへアニメーションする
            point = locationLabelArray[distance.minIndex].center
            imageBeHereNow.location = distance.minIndex
        } else {
            //最小値の距離が50以上の時は、元のlocationへアニメーションする
            point = locationLabelArray[imageBeHereNow.location].center
        }

        animationWithImageView(imageBeHereNow, point: point)
    }


    //引数1のUIImageViewを引数2の座標へアニメーションするメソッド
    func animationWithImageView(ImageView: UIImageView, point: CGPoint) {
        UIView.animateWithDuration(0.2, animations: { () -> Void in
            self.imageBeHereNow.center = point
        })

    }


}
今までもできたことが多いんですが、自分でクラスを作成したり継承したりすることで、(自分的に)わかりやすく実装できた気がします。